
Adjustments
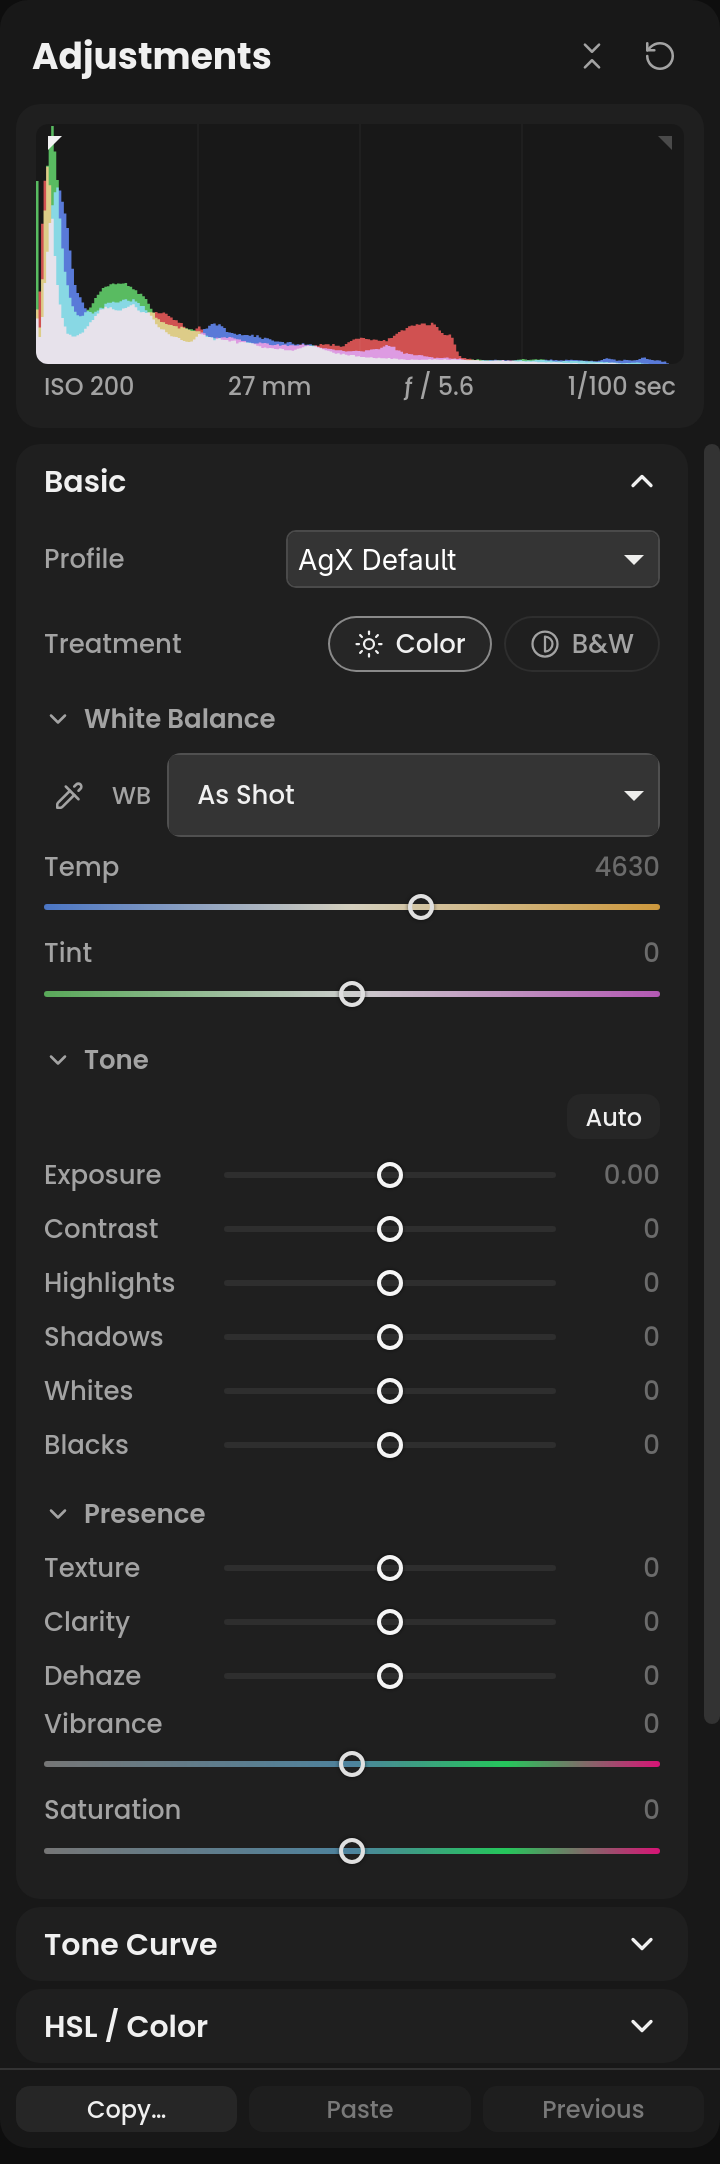
The Adjustments panel holds the familiar develop panels, in their usual order and with their usual slider names. Each slider drives one of darktable’s modules; hover over a slider’s row to see which (“darktable: …”).
If you’ve used another editor: the sliders behave as you expect, and most have the usual range. Where Immage differs, this page says so. There is no process version to choose: the tone mapper, AgX, plays that part.
Working with sliders
- Drag a slider, or click on its track.
- Double-click the slider or its name to reset it.
- Double-click the number to type a value; Enter sets it, Esc cancels.
- Scroll over a slider to nudge it, if Scroll adjusts sliders is on in Preferences › General. It is off by default, so scrolling just scrolls the panel.
- Hold ⌥ while dragging some sliders to see what they affect: the sharpening and noise sliders show the photo in gray, and their masking sliders show where they act.
- While you drag most sliders, the photo renders at half size so it can keep up, and sharpens when you let go. Grain, Texture and Sharpening also wait until you let go, unless they are what you are dragging. Preview in Preferences sets how far this goes: Quality turns it off, Performance goes further.
Panels: click a panel’s title to open it. With Focus mode on (the default), opening one closes the others; ⌥-click opens one alongside. The buttons in the panel’s head collapse or expand them all, and Reset all takes the photo back to its starting point (⌘Z undoes it).
Preset rows: some sections have a row of swatches or buttons, such as the B&W filters or the grain amounts. Hover over one to preview it on the photo; click to apply it.
Basic
Profile: the color look a raw starts with. The first group is AgX’s own looks, which change how colors brighten toward white and the shape of the tone curve: AgX Default, Unmodified Primaries, Blender, Blender Punchy, Sigmoid-like, Sigmoid-like Smooth and Smooth. Contrast, Whites and Saturation work from the look’s own values. The second group is darktable’s color balance rgb: Standard, Natural Skin, Vibrant Colors and Legacy, which add colorfulness on top of AgX Default. New raws get the profile set in Preferences (AgX Default unless you change it).
Treatment: Color or B&W. Black and white swaps HSL / Color for B&W Mix.
White Balance (darktable’s color calibration)
- Temp: 2000-25000 K. Tint: -150 to +150. Both start As Shot, and double-click goes back to it.
- The eyedropper (W) picks a neutral spot: click something that should be gray. It refuses a clipped or black spot. Esc cancels.
- The WB menu has As Shot, Auto, Daylight, Cloudy, Shade, Tungsten, Fluorescent and Flash.
- Auto judges the light by the brightest unclipped parts of the photo. When the camera set its own white balance, Auto trusts it and only nudges it, so a sunset or a field of green keeps its color.
Tone
- Auto: sets Exposure, then Contrast, Highlights, Shadows, Whites and Blacks from the photo. It brightens a dark photo only until its bright parts are well placed, and darkens a bright one only until its shadows are, so a night scene stays dark and snow or a sunny beach stays bright. Such a scene also keeps its shadows unlifted, or its highlights and blacks untouched. A photo with nothing dark in it, such as a plane against clear sky, keeps its blacks too, rather than its sky being darkened. Under AgX it also sets AgX’s range.
- Exposure: -5 to +5 stops.
- Contrast, Highlights, Shadows, Whites, Blacks: -100 to +100. Whites moves the top of the tone mapper’s curve, and under AgX also brightens or darkens the brightest tones ahead of it; Blacks moves the black point, and works the same at any Exposure.
Presence
- Texture: fine detail; negative values smooth it.
- Clarity: midtone contrast (darktable’s local contrast).
- Dehaze: removes haze; negative values add it.
- Vibrance and Saturation.
With contrast & texture selected for Clarity or Texture in Preferences › Modules, that slider becomes Medium details and Fine details (-1 to 5). Advanced reveals Coarse details (-1 to 5), Base detail level (1–15), Halo control (-10 to 10), Noise bias (0–1), Shadows and Highlights (-5 to 5). Clarity and Texture use separate instances, including on masks. This module currently runs on the CPU.
Contrast equalizer
Choose Custom, then Global › Contrast › contrast equalizer in Preferences › Modules for a photo whose Contrast has not been edited. In Basic, a graph replaces the Contrast slider. It adjusts detail by spatial scale rather than tonal range.
Select Luminance, Chroma, Edges, Luminance noise or Chroma noise. Each channel has six points, from Coarse on the left to Fine on the right. Click near a point and drag vertically to change that band. Pull up to boost, down to reduce; the noise channels set noise thresholds. Focus a point and use Up/Down to adjust it, or Home to restore its neutral value. Reset restores all five channels. To use the graph inside masks, choose Masks › Contrast › contrast equalizer in the same preferences tab. Global and mask choices are independent, so global Contrast can use AgX while masks use the equalizer. Existing adjustments keep their selected module.
Tone Curve
Two modes, switched at the top of the panel:
- Point: click the curve to add a point (up to 20), drag to move it, and double-click it or drag it off the graph to remove it. RGB is the main curve; R, G and B adjust one channel.
- Parametric: Whites, Highlights, Midtones, Shadows and Blacks sliders, named as in Basic, each bending the curve in its own band of tones. Three Split Points move the borders between the bands; Midtones spans the two around the middle split.
The graph shows the histogram behind the curve. Hover over the photo to see where a pixel sits on the curve. A curve drawn in darktable shows a note; moving a slider replaces it.
HSL / Color
Hue, Saturation and Luminance tabs, each with eight bands: Red, Orange, Yellow, Green, Aqua, Blue, Purple and Magenta. Hue moves each band up to 30° either way. Saturation at -100 turns its color gray. Luminance changes vivid colors the most and leaves pale ones nearly as they were.
Each band acts most on its own color and fades out toward the bands either side, as in Lightroom. Blue and Purple sit close together, so each also reaches part of the other’s colors.
A photo whose HSL was set in darktable, or in Immage before 0.37.0, can open with a band’s setting spread over its neighbors’ sliders, or past the end of a slider. It looks as it did; moving a slider carries on from there.
Hover over the photo: the panel’s title shows the color under the pointer, and its band’s sliders glow. Uses darktable’s color equalizer.
B&W Mix
Shown instead of HSL / Color when Treatment is B&W. The same eight bands set how light each color turns in gray.
- Auto mixes from the photo’s own colors, so colors that would merge into one gray stay apart.
- The filter swatches, None, Red, Orange, Yellow, Green and Blue, work like a colored filter on black and white film. Hover to preview.
For working on black and white tones as zones, see Zone System.
Color Grading
Shadows, Midtones, Highlights and Global, each with a Hue (0-359°), Saturation (0-100) and Luminance. Switch the view between 3-Way, Global and Sliders.
On a wheel, the angle is the hue and the distance from the middle is the saturation. Drag the dot; double-click a wheel to take its saturation back to 0.
Detail
Enable Detail loupe in Preferences › General › Workspace for compact 100% previews above Detail and Presence. Their point pickers select the same area. Detail and grain drags preview that area directly; with the loupe off, they keep the visible image at full preview resolution. Release updates the full visible view. Tone and contrast controls retain whole-image previews.
Sharpening (darktable’s sharpen, or diffuse or sharpen)
Sharpen as your last step. New raws start with it off. It runs on darktable’s sharpen unless Preferences › Modules picks diffuse or sharpen, and each shows its own sliders:
- sharpen:
- Amount: 0-100; 0 is off.
- Radius: 0.5-3 px (2 by default).
- Threshold: 0-100 (5 by default). Leaves differences smaller than this alone, such as noise.
- diffuse or sharpen, which is slow to render: while it is on, Exposure,
Blacks, Temp, Tint and the lens corrections take longer to update the
photo.
- Amount: 0-5; 0 is off.
- Radius: 1-12 px (3 by default).
- Sensitivity: 0-4.
- Masking, on either: 0-100. Sharpens only the edges as it rises; ⌥-drag shows where. Raws only.
AI Denoise (darktable’s raw denoise)
Click Denoise…, pick an Amount (1-100) and click Denoise.
The dialog previews a piece of the photo at 1:1, starting where you are
zoomed in. Amount changes it at once. Hold the preview to see it without
AI Denoise, and drag on the small photo beside it to preview another
part, which takes a moment.
Immage writes a new DNG beside the raw, named <name>_raw-denoise.dng.
This takes up to a minute, and the model downloads on first use. It runs
in the background: you go on editing, this photo or another, while the
bottom left of the photo shows it under way. When it’s done, Open
there opens the DNG. The DNG starts with the raw’s edit as it was when
you clicked Denoise, and the first time it opens, Profiled Denoise’s
Luminance and Color go to 0, since the AI took the noise out. It is a
photo of its own and sits after the raw in the folder; the raw itself
isn’t changed. Raws only, in a folder on this computer, one at a time.
To try another Amount, run it again on the raw; the next DNG is
<name>_raw-denoise_1.dng.
The DNG retains its format identification, color calibration and sensor layout when the source EXIF and denoise marker are added, so it also opens in darktable. Run AI Denoise again to replace an older result that cannot open.
Profiled Denoise (darktable’s profiled denoise)
- Luminance, Color and Detail, 0-100. Detail keeps edges and texture out of the noise reduction (raws only). New raws start with it off, as darktable’s AgX workflow adds it only where a photo needs it.
Raw-only sliders are grayed out on a JPEG.
Lens Corrections
Defringe removes color fringes using darktable’s chromatic aberrations: Amount sets strength and Radius sets its reach. Amount 0 switches it off. This is separate from Remove Chromatic Aberration and from the module choice for a mask’s Defringe.
- Enable Profile Corrections: corrects distortion and vignetting for the lens darktable detects (through the lensfun database).
- Remove Chromatic Aberration: on by default.
The Default preset that new raws get turns profile corrections on.
Hot Pixels (raws only) replaces pixels much brighter than their neighbors, the stuck or hot pixels of long exposures and high ISO, with the brightest of those neighbors. It is off until Remove Hot Pixels is turned on.
- Strength: how much brighter than its neighbors a pixel must be to count as hot. At 25 it must be 8 times brighter, at 100 twice as bright; higher finds more.
- Threshold: how bright a pixel must be to be checked at all; lower finds hot pixels in darker areas.
Transform
Upright corrects the photo from its own straight lines, using darktable’s line detection and fit from its rotate and perspective module:
- Auto: levels the photo and makes vertical lines plumb. It corrects horizontal lines too when the photo has enough of them.
- Level: rotation only.
- Vertical: level, with vertical lines made plumb.
- Full: level, with vertical and horizontal lines both corrected.
- Guided: drag along two to four lines that should be plumb or level. The photo is corrected after each guide. Drag a guide’s end to move it, or select a guide and press Delete to remove it. Press Done or Escape to finish.
- Off: removes the Upright correction.
Auto, Level, Vertical and Full set the Manual sliders back to 0.
Manual adjusts on top of Upright:
- Vertical and Horizontal: correct converging lines.
- Rotate: -45° to +45°.
- Aspect: stretches the photo wider or taller, 0.5× to 2×.
A grid shows over the photo while a Transform slider moves or Guided is on. The edges the correction pulls in are cropped automatically.
Straighten, the panel’s first section: press its button, then drag along a line that should be level or upright, and Rotate is set to match. Holding ⇧ and dragging on the photo does the same without the button. The crop tool has it too; see Crop.
Effects
Post-Crop Vignetting: Amount, Midpoint, Roundness and Feather. While Effects is open and Amount isn’t 0, guides on the photo show the vignette. Drag the midpoint to move it, an edge to change the feather, or the center to move the whole vignette.
Grain: Amount and Size, with None, Low, Medium and Heavy swatches that show a sample of the grain.
Tone mapper
How the scene’s light is fitted to the screen isn’t a slider in this panel. Immage gives a photo opened for the first time darktable’s AgX, which keeps bright colors from going garish. A photo started under darktable’s Sigmoid, in darktable or an earlier Immage, keeps it.
See Preferences.
Loupe rendering pauses while selecting or browsing photos in grid view and refreshes when you return to the photo view.
This page is part of immage's own docs, at v0.41.1. View the source on GitHub.